
Summary
- Access your PitchCard.
- Complete all required fields, indicated by an asterisk.
- Select "Next" when you are ready to move to the next page.
- When every required field is completed, select the "FINISH" button to complete your PitchCard.
Desktop Setup
Setup Details
Sign in to Pitch59.com.From your desktop or laptop computer, go to pitch59.com and select Log in or Signup.
-
-
- If you already have a free Pitch59 user account, select Log in then enter your credentials.
- If you do not have a free Pitch59 user account:
- Select Sign up.
- Complete the signup form. For detailed instructions on signing up for a Pitch59 account, visit How to Sign Up for Pitch59.
- You will be logged in automatically after confirming the OTP code sent to your email.
-

Select "Pricing" or the "Create PitchCard" button at the top of the Pitch59.com landing page.
.png?width=250&height=144&name=Screenshot%20(5).png) Choose your PitchCard
Choose your PitchCard-
-
-
-
-
-
-
-
- For the free Resume PitchCard: Select the Resume PitchCard. *NOTE: You must agree that the Resume PitchCards are only for those who are looking for or seeking new employment. They are not to be used by businesses. Click the checkbox to agree. Select Edit PitchCard. You will then be taken to PitchCard creation.
- For the Business PitchCard, select how many you would like to purchase.
- Select the "ENTER PAYMENT INFO" button if you haven't put in your credit card information.
- Enter your payment information
- Select Save
- Enter a promo code if applicable.
- Review your purchase then select the "PAY NOW" button when ready.
- If you added a single PitchCard, Select the "CREATE PITCHCARDS" button then follow the Finish PitchCard instructions below. If you added more than one you will be taken to the Team Manager.
- Select the "ENTER PAYMENT INFO" button if you haven't put in your credit card information.
-
-
-
-
-
-
-
PitchCard Creation
Note: The following instructions show how to setup a Business PitchCard. Resume PitchCards have slightly different fields and pages.- After selecting the "CREATE PITCHCARDS" button, complete all the required fields on each page.
-
- Billing
- This tile was completed when you made your purchase. Use this page to update your payment method and/or review your billing history.

- Select "NEXT" to save any changes you have made and move to the next page.
- This tile was completed when you made your purchase. Use this page to update your payment method and/or review your billing history.
- Information
.png?width=250&height=187&name=Screenshot%20(3).png)
- Complete the required Name, Business Name, Email, Phone Number, and all Address fields.
- Optionally, enter your position or title and provide a number where others can text you.
- Check any of the boxes to the right of the fields if you do not want the information displayed on your PitchCard. You can check or uncheck them at any time.
- Your unique PitchCard link is created automatically. If you wish to change the link, click the pencil icon and edit the information following the final slash (/). The changes you submit will be saved if they are unique from all other active PitchCards.
- Select "Next" to save your changes and move to the next tile.
- About Me

- Make one or more selections for the required "What services does your company provide" field. Begin typing your job position, then choose the closest match. Note: This is not an option for Resume PitchCards.
- Enter your calendar and social media links in the optional fields provided.
- Optionally add your business hours.
- In the optional "Your Bio" field, enter any additional information you wish to share.
- Select "Next" to save your changes and move to the next tile.
- Employment (Only for Resume PitchCard)
- Add your positions of interest such as sales, marketing, or receptionist. Once you start typing a dropdown menu will appear.
- Choose what type of work you're looking for such as full-time or part-time.
- Add your level of education.
- If you have attended or are attending a college/university type in the name of the college.
- Check if you are in the military or are a veteran.
- Click "Next" to continue.
- Uploads

- Upload your Profile Picture. This is the picture that will be displayed on your PitchCard before and after your video plays if you have one.
- Upload your Logo for Business PitchCards or Resume for Resume PitchCards. The logo will have a direct link to your website. Your resume will show in the same spot as the logo for businesses.
- Optionally, upload other pictures or files you wish to make available to your audience.
- You can also upload any video testimonials or references. Videos must be 59 seconds or less.
- Select "NEXT" to save your changes and move to the next page.
- Pitch

- The Elevator Pitch Creator will help you write your pitch if you choose.
- To use the AI-enhanced elevator pitch creator, answer the five questions then click "Create My Pitch". Once your pitch is written, it will display in a text box where you can edit and make changes. You can also select "Try Again" to have the AI rewrite the pitch.
- If you don't want to use the Elevator Pitch Creator, toggle the "Help me script my pitch" off. A text box will appear where you can write your pitch or paste it in from somewhere else.
- Once your written pitch is finished, you will have the option to add a video pitch. "Select Written + Video Pitch". You will be given the choice to Record your pitch or to upload one.
- To record one, select the "Record" button to use the built-in tools to record your video. You will see ideas on what to talk about as well as a teleprompter that will show the written pitch you just finished. Check out this video for instructions and tips on making an outstanding pitch video.
- To upload a video, select "Upload".
- After recording or uploading your video, select the "FINISH" button to complete your PitchCard
Note: Your written pitch and pitch video can be changed or updated at any time.
- Billing
-
App Setup
Notes about editing PitchCards in the app:
The app can be used to edit any single PitchCard from "My PitchCards". This includes PitchCards assigned to you from a company using the Team Manager. For more information about the Team Manager visit Team Manager Setup.
Summary
- Access your PitchCard.
- Complete all required fields, indicated by an asterisk (*), on each tile.
- Select "Next" when you are ready to move to the next page.
- When every required field is completed, including your written pitch, select "Finish" to complete your PitchCard.
App Setup Details
- Download and install the Pitch59 app on your mobile device by following this link on your mobile device.
- Open the app
- Select Log In or Sign Up. For detailed instructions on creating an account visit How to Sign Up for Pitch59.

- After you enter your information to create an account, you will receive an email with an OTP code. Enter the OTP code to complete your registration.
- Select Log In or Sign Up. For detailed instructions on creating an account visit How to Sign Up for Pitch59.
- Log into the app

Note: If you are logging in for the first time, you will be prompted to "Get Started".
- Choose which PitchCard you would like. You can choose between a Business PitchCard or a Resume PitchCard.
- If you want to create a Resume PitchCard, click on it then choose "SELECT".
Note: You will be notified that you are only to use a Resume PitchCard if you are seeking employment opportunities. If you agree, select “Yes”. - To create a Business PitchCard, follow the steps under "Purchase a PitchCard".
- Purchase a PitchCard
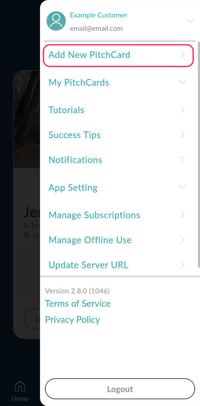
- If you already have a business PitchCard and would like to subscribe to another: Click your profile at the bottom right of the screen. Click "Add New PitchCard" from the menu.
- .Choose the Business PitchCard then click "SELECT".
- This will take you to your app store's subscribe page. Click Subscribe.
- After subscribing, a thank you message will appear, Click Create PitchCard.
- Set up your PitchCard
Note: Some of the PitchCard setup steps vary between the Business PitchCard and the Resume PitchCard. All required fields on each page must be completed before you can finish your PitchCard. Required steps are indicated by an asterisk (*). The following steps show the completion of a Business PitchCard.
- Information

-
-
- Complete the required Name, Business Name, Email, Phone Number, and the Address fields.
- Optionally, enter your position or title and provide a number where others can text you (if it's different from your phone number).
- Check any of the boxes to the right of the fields if you do not want the information displayed on your PitchCard. You can check or uncheck them at any time.
- As you scroll down the screen, you will see your unique PitchCard link. This is created automatically but you can edit it if you wish. Click on the pencil icon and edit the information following the final slash (/). The changes you submit will be saved if they are unique from all other active PitchCards.
- At the bottom of the page, you can turn your 3-Way Introduction Message and your Referral Request Message on or off. They are defaulted to on. You can also change the messages to fit your personal brand.
-
-
 About Me

- "What services does your company provide?" is the only required field. Once you start typing, a list of options will appear. You may need to scroll to find the service you're looking for. If your service isn't in the dropdown list, type it in and it will be submitted for approval.
Note: There are no required fields for a resume PitchCard on this tab. - You have the option to add links to your website, calendar, social media, and more. You are able to add a custom call to action (CTA) to each link.
- As you scroll down, you can add your business hours and any other information you would like to share.
- "What services does your company provide?" is the only required field. Once you start typing, a list of options will appear. You may need to scroll to find the service you're looking for. If your service isn't in the dropdown list, type it in and it will be submitted for approval.
- Uploads

- "Upload your profile picture" is required. This image will be displayed on your PitchCard. If you have a video pitch, it will display before your video is played. It is best if your profile picture is in landscape view so it fits in a video-size frame.
- While "Upload business logo" isn't required it is recommended if you have one. You have two cropping options, circular or rectangular. Your logo will be an active link to your website. If you are creating a Resume PitchCard, this is where you will upload your resume.
- "Upload gallery photos/files" is where you can upload any other images or documents you'd like others to see. This could include samples of your work, certifications...
- "Upload video testimonials" Ideally, your customers, clients, or members of your network will record their own video and add it to your PitchCard, however, if you have testimonials or references that were sent to you, you can add them in the "Upload video testimonials" section. Keep in mind all video testimonials must be 59 seconds or less.
- Pitch
 The elevator pitch is the most important part of your PitchCard. This is where people get to know you, what you do, and why they should choose you over somebody else.
- If you want to write your own pitch or if you already have one created, click the toggle button to turn off "Help me script my pitch". There will be a text editor where you can write or paste your written pitch.
- To use the AI-enhanced elevator pitch creator, answer the five questions then click "Create My Pitch". Once your pitch is written, it will display in a text box where you can edit and make changes. You can also select "Try Again" to have the AI rewrite the pitch.
- Your written pitch should be between 40 and 220 words.
- As you scroll down the page you will be asked if you would like to display just your written pitch or if you would like to add a video pitch.
- "Select Written + Video Pitch". Adding a video pitch is highly recommended but not required. You will be given the choice to Record your pitch or to upload one.
- To record one, select the "Record" button to use our built-in tools to record your video. You will see ideas on what to talk about as well as a teleprompter that will show the written pitch you just finished. Check out this video for instructions and tips on making an outstanding pitch video.
- To upload a video, select "Upload".
- After recording or uploading your video, select the "FINISH" button to complete your PitchCard
- Information
Your PitchCard is meant to go with you so we've made it completely editable. You can change your answers, written pitch, and video at any time. Everyone who has your PitchCard will see those changes and edits the next time they look at it.